Renovating A House Checklist: Where to Start

Dusty Rhodes • November 8, 2021

Home renovations provide homeowners with the opportunity to take their house and turn it into a home they’ve always dreamed of – all while increasing the home value. And, with the change of seasons, maybe you’ve decided it’s time for something new. Whether you recently purchased an older home, or have been living in the same house for years, you can make your dream home a reality with the help of this renovating a house checklist.


Renovating a house can be a scary concept – where do you start? Who do you call? But before you get overwhelmed, we’ve created a checklist to help answer all your questions and guide you through the home renovation process. From strategizing a plan and budgeting, to hiring a professional and putting the finishing touches on your home, read on to see just how you can make renovating a house that much simpler.

Renovating a house checklist: Where to begin

As you research what to expect during a home renovation, you should also outline your ideas and plans – maybe you’re interested in adding an office or redoing the kitchen, the possibilities are endless. Make sure you know what your goal is for the renovation and keep in mind that the project likely won’t be completed all at once.


To determine your budget, prioritize which projects are on the top of your list and what you can live without. Need help figuring out which renovations you want? Consider popular home trends in your area to help narrow down your options. Make sure to budget for any problems that could arise during the initial structure check as well as any problems during demolition. Creating a budget buffer can give you peace of mind if there are any unexpected issues or surprises down the road. Once you have established your budget, you can begin creating a reasonable time frame to help you stick to a schedule. After planning your renovation, you will need to make sure you have the appropriate home improvement permits depending on the type of projects you have in mind. 


Take this time to look over your plans and decide which professionals to hire when renovating your house. From structural engineers and plumbers, to architects and contractors, there are countless professionals who can help you achieve your home renovation goals.

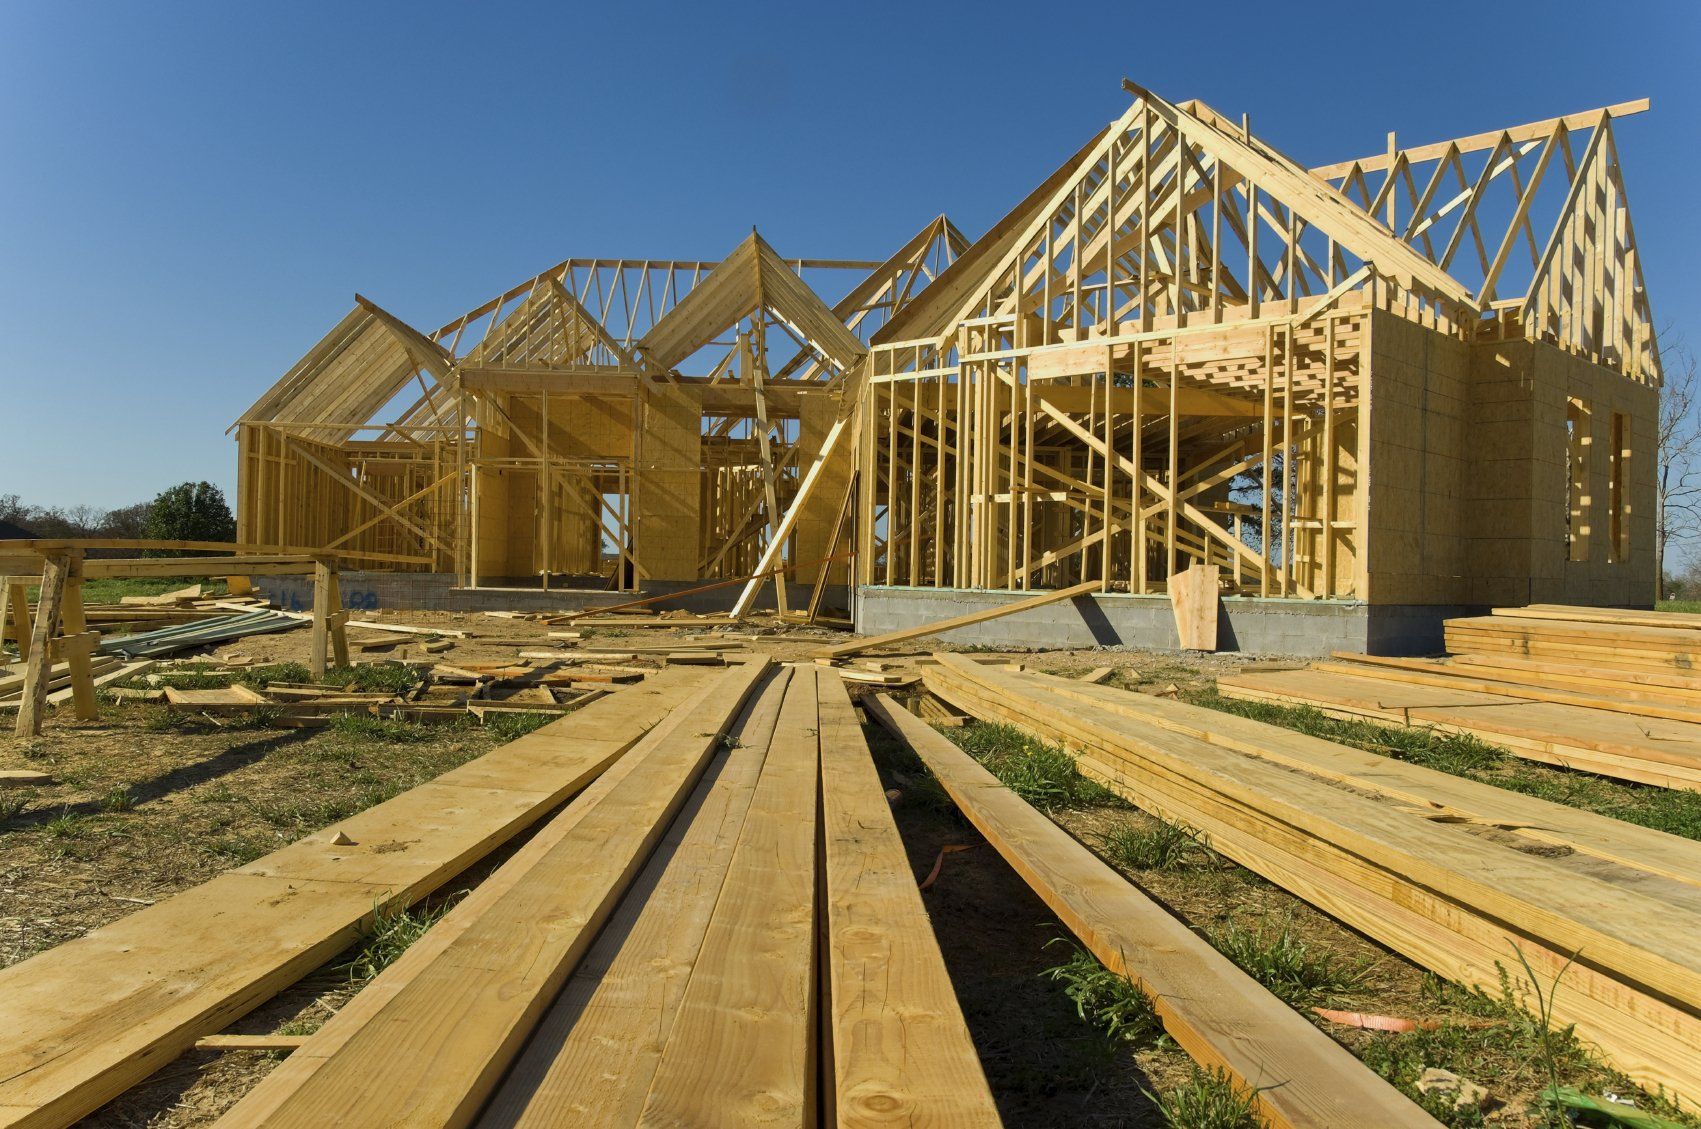
1) Begin with the fundamentals

For a total house renovation, the rule of thumb is simple: make sure the structure is solid before starting on major projects. This includes checking the foundation, electrical systems, plumbing, flooring, and roofing. Older houses are more likely to develop these problems, but it’s important to check all your bases no matter how old your house is. There are ways for you to confirm the condition of your home’s structure, but when you do start to see issues arise, it is essential that you include a structural engineer to help resolve any problems. 


Foundation 

For signs of foundation issues look for doors and windows not shutting properly or cracks and gaps along the edges of the wall and floor. If you suspect any issues with the foundation, a structural engineer can help diagnose the problem and create a plan to address any repairs.


Plumbing and electrical 

You should also have your plumbing and electrical systems checked before beginning any renovations. Both plumbing and electrical systems should be up to date so they’re equipped to handle modern day appliances and piping. If your house was built before the 1960’s, it is a good idea to swap out your pipes and wires, making your home more reliable for years to come. 


Roofing

No matter where you live, a strong and protective roof is essential. Knowing when you need it repaired vs. replaced is something you should pay attention to. If the roof is on the newer side, watch for loose shingles and repair as needed. Roof damage that may result in a complete replacement includes wall and ceiling stains from leaks and trapped moisture, attic leaks from damaged shingles, exterior paint peeling from trapped moisture, and cracked shingles. 

2) Interior demolition

Now, it’s time to start designing your interior. If you planned on demolition, you have two options: DIY or connect with a contractor. Your budget will help determine if DIY or working with a professional is the right option. 


Constructing the inside of your home can mean totally reinventing your living space. Take down walls to open your space up or reconstruct your home’s floor plan and construct new walls. If you upgraded your electrical systems or plumbing, your walls will already be open so now is a good time to insulate and close them with drywall. Starting interior demolition room-by-room will help keep the renovation organized. Here are four interior changes to consider adding to your renovating a house checklist:


Built-ins 

Believe it or not, built-ins can provide value to a home. Built-ins are custom-made, permanent storage that adds character to your home. They come in many different forms – shelving, dining nooks, closets and much more. Not only are built-ins a great way to save space, but they can help create a unique and long-lasting feature in your home.


Windows

Upgrading windows can not only enhance your curb appeal, but can improve your home’s efficiency. That way you can enjoy the seasons through crystal-clear windows, while also investing in your home’s value. 


Cabinets

Although mostly a cosmetic touch, upgrading your cabinets can enhance the design of any space – kitchen, bathroom, or hallway. If new cabinets are not in your budget, a fresh coat of paint can go a long way to bring a fresh look to a newly remodeled home.


Flooring

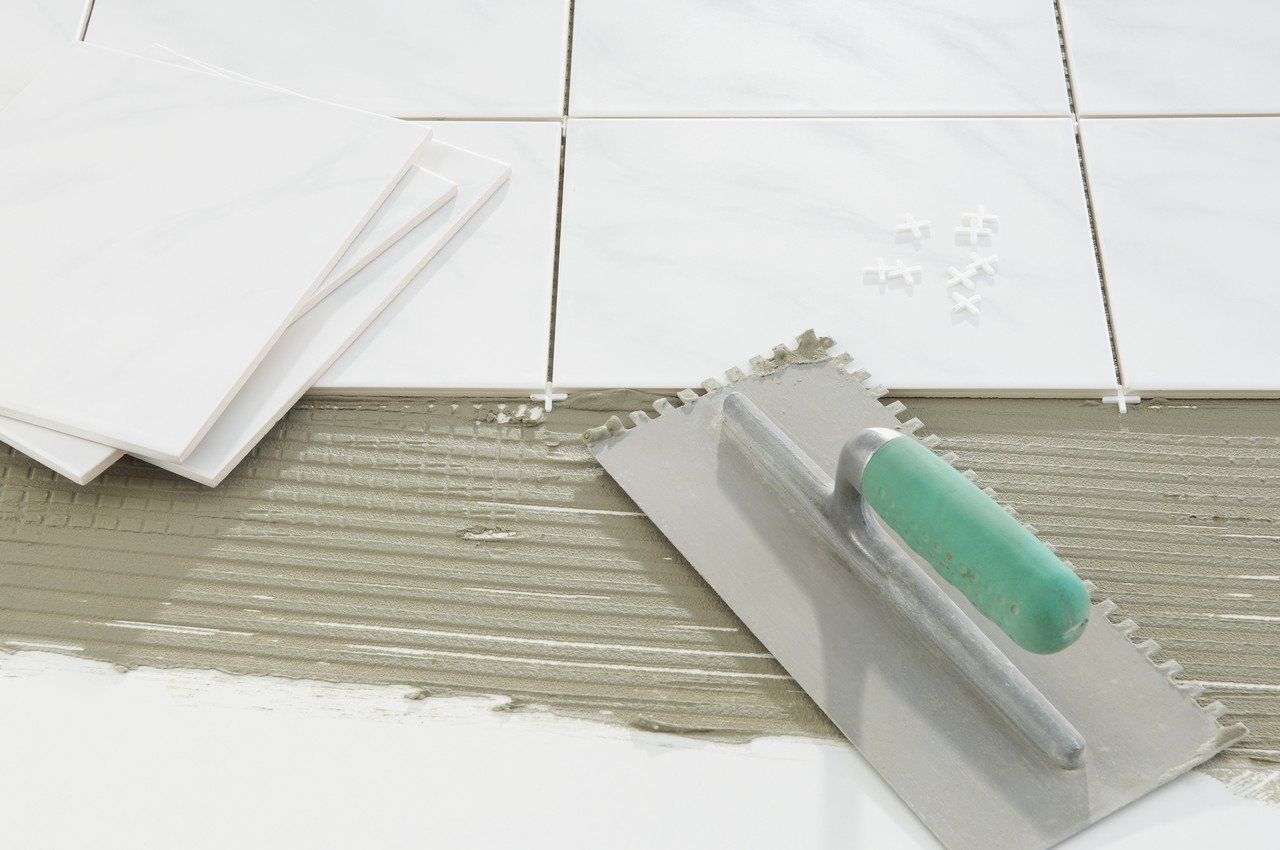
Flooring plays a huge role in your home renovation. Should you opt for tiles or carpet? Real wood or vinyl? These are questions that play into your home renovation goal. Maybe you have a pet that likes to scratch up carpet? You may want to opt for tile. Maybe you live in a city with cold winters like Vancouver, BC, or Buffalo, NY? Carpet may be a better fit. Deciding what flooring fits best with your needs will help you answer these important remodeling questions.

3) Home furnishings

Now you’re on the home stretch. Home furnishings will tie in everything you have accomplished during this renovation process and bring your home to life. New wall paint, plant additions, pillows, and rugs can make all the difference. Once you incorporate these new pieces in your home, implementing basic feng shui home design into your space helps ensure your home brings you positive energy.


The commanding position is one of the most important feng shui principles to help align your home. With this position, you are not directly in line with the door, but are facing it. Just make sure your furniture is never positioned so your back is turned to the door. This simple trick can boost your energy and give you the style you’ve been looking for.


After your home is furnished, the renovation process is complete. Take a deep breath and appreciate your accomplishments. There are many different routes to go about renovating, but we hope this renovating a house checklist will help you start on the right path towards creating your dream home.


Source: Redfin


Dusty Rhodes Properties is the Best Realtor in Myrtle Beach! We do everything in our power to help you find the home of your dreams. With experience, expertise, and passion, we are the perfect partner for you in Myrtle Beach, South Carolina. We love what we do and it shows. With more than 22 years of experience in the field, we know our industry like the back of our hands. There’s no challenge too big or too small, and we dedicate our utmost energy to every project we take on. We search thousands of the active and new listings from Aynor, Carolina Forest, Conway, Garden City Beach, Longs, Loris, Murrells Inlet, Myrtle Beach, North Myrtle Beach, Pawleys Island, and Surfside Beach real estate listings to find the hottest deals just for you!

Share

By Dusty Rhodes October 13, 2025
From the first coat of paint you used to freshen up your house’s trim to the stress of wrangling your way to a deal, you’ve been through a lot in that place. Now you’ve made it to the final hurdle of selling a home: moving out! Don’t worry, this is the easy part… but you want to do it right. Here’s how to get through the last leg of your journey without any bumps along the way. How to move out on time Once the paperwork is signed at closing, the buyers will officially own the house—and you won’t. That means that, technically, if you or your stuff is still there after the close, “the buyer could evict you,” says Joshua Jarvis , founder of Jarvis Team Realty in Duluth, GA. So make sure to have your exit strategy in place! Still, most buyers will understand if you need a bit more time and have a legitimate reason—like if you can’t move until the weekend due to your work schedule. Just be sure to discuss these issues as soon as possible before the close, so your buyers can plan accordingly. Decide what to leave behind To make sure you’re leaving behind everything the buyer wanted—and that you agreed to—double-check the closing documents . There should be an itemized list of what comes with the house . And even if the buyers didn’t formally request them, it’s just good form to leave certain types of things behind. Such as? “Generally speaking, you should leave anything that’s bolted to the wall,” says Jarvis. “Some homeowners want to take their fans and blinds to the next home, but generally if it’s screwed in, it stays.” Also, if you and the buyers agreed to transfer any services—such as alarm monitoring or pest control —be sure to set that up before you go. Leave the buyers a detailed note in the house, or ask your agent to get in touch with theirs to make sure the transfer goes smoothly. If you do inadvertently take an item that the buyers had requested, they have the right to ask for it back—and they could potentially sue you in civil court for the cost of a replacement. So, when in doubt, feel free to check with the buyers before you grab and go. But don’t leave anything else behind Just as important as what you leave behind is what you don’t. Your buyers have a right to move into a home that’s been cleared of furniture and other movable items they didn’t expressly request. “Some folks leave all kinds of unwanted clothes, furniture, paint cans, and other items, thinking they are helping the buyers,” Jarvis says. If you truly think your buyers might love to have your old planting pots or kiddie equipment, go ahead and ask—but please don’t assume they’ll welcome your leftovers. Even if you’re careful, you might forget something—at which point the buyers may contact their agent to get it back to you, but they also have the legal right to just keep or get rid of it. So double-check areas (e.g., the attic, garage, basement, storage shed, kitchen, and bathroom drawers) where people commonly overlook items. Clean up It’s common courtesy to leave the place not only clear of your possessions but also clean. However, that doesn’t mean you have to leave it immaculate. “Generally, you shouldn’t have to pay to have it deep cleaned,” Jarvis says. In most cases, a simple broom-clean will do. That means wiping down the countertops, cleaning out drawers, sweeping or vacuuming all the floors, and giving the bathroom and kitchen appliances a once-over so the new owners aren’t grossed out when they arrive. Are you forgetting anything? Before you close the door for the last time, run through a quick checklist. Did you eyeball every room for stray items? Have you forwarded your mail and turned off the utilities? Is the water running in the jacuzzi? We all get in a bit of a rush even in the best planned moves, but you won’t be able to get back in, so it can’t hurt to do a final run-through before you move out. Once you’re ready, it’s time to leave. You can drop a line to your real estate agent to let them know you’re out, although it’s usually a courtesy more than a necessity. If you’re feeling truly gracious, feel free to leave a note, card, or bottle of bubbly congratulating the people who’ve inherited your former home. Given all the fond memories you’ve built between those walls, wouldn’t it be nice to start the home’s new owners off on the right foot? And buy yourself some Champagne, too. Make it the good stuff—you’ve earned it. 
By Dusty Rhodes October 6, 2025
Buying a home is an exciting time, whether this is your first time purchasing a house or you’re a repeat buyer. But if you’ve owned a home before, you may be wondering if you can be a first-time home buyer again. In some cases, yes, you can. In this Redfin article, we’ll go over what qualifications you need to meet and when you can be considered a first-time homebuyer again. Whether you’re buying a home in Atlanta, GA , or a condo in Portland, OR , read on to find out if you’re eligible to be a first-time homebuyer twice. Key takeaways Usually, you’re a first-time homebuyer again if you haven’t owned a home in 3 years. Some special situations may also qualify you as a first-time buyer. Benefits include down payment and closing cost assistance and lower interest rates. When are you considered a first-time homebuyer again? Typically, you’re considered a first-time homebuyer again if you have not owned a primary residence for at least three years. There are several additional reasons you may qualify as a first-time homebuyer again, which we’ll explore below. Some first-time homebuyer programs have different definitions of “first-time homebuyer,” so check with the specific program before proceeding. Qualifications to be considered a first-time homebuyer There are other reasons you may qualify as a first-time homebuyer twice. Let’s take a look at them: You haven’t owned a primary residence for 3 years: This means if you owned a home, but sold it and rented for 3 (or more) years, you can be considered a first-time home buyer again. If you’re buying with another person, only one of you needs to meet the criteria to use most first-time home buyer programs. You’re a single-parent buying on your own: If you’ve never purchased a home by yourself and are a divorced single-parent, you may qualify again. Even if you purchased a home with your former spouse, you likely still meet the criteria. You’re a displaced homemaker/family caregiver: If you are a displaced homemaker who doesn’t or didn’t earn wages from employment and has only owned a home with a former spouse, you’re likely considered a first-time homebuyer. You previously owned a mobile home: If you owned a mobile home or property not affixed to a foundation, then you likely qualify. Your previous home was out of compliance: If your home had building code violations or safety issues that could not be repaired or brought into compliance for less than the home’s value, you’re likely eligible. Benefits of being a first-time homebuyer again There are benefits to being a first-time homebuyer twice. Let’s take a look at them: Access to first-time homebuyer programs: One of the biggest benefits is the ability to use first-time homebuyer programs such as down payment and closing cost assistance , grants, credits, or loans. Every program has different qualifications, so make sure to research each program or speak with your agent and lender to explore options. Options for low down payment mortgages: There are several loans available for first-time buyers that offer lower down payment amounts. For example, Freddie Mac’s Home Possible and Fannie Mae’s Home Ready offer down payment amounts as low as 3%. Potentially lower mortgage rates: Sometimes, lenders will offer slightly lower mortgage rates to first-time borrowers to help them buy their first home. FAQs about first-time homebuyers Can I be a first-time homebuyer again if I previously owned a home? Yes, as long as you haven’t owned a primary residence in the last 3 years, or you owned a home while previously married. Do both homebuyers need to be first-time homebuyers to qualify? No, in most cases, as long as one homebuyer meets the qualifying criteria, then you’re considered a first-time homebuyer. However, some programs require both homebuyers to be first-timers. Can I qualify for a first-time homebuyer loan again? Yes, for the most part, if you qualify as a “first-time homebuyer,” you can get another first-time homebuyer loan. Every lender and loan is different, so be sure to read the eligibility criteria thoroughly. Are there income limits for programs? Yes, many first-time homebuyer programs have income limits. This means you won’t qualify if you make more than the specified annual amount.
By Dusty Rhodes September 29, 2025
Enhancing your living space doesn’t always require a hefty budget. With the right updates, you can add real value to your home for under $1,000. Whether you’re preparing to sell your home in Grand Rapids, MI , or looking for some easy DIY projects for your house in Portland, OR , these cost-effective upgrades can breathe new life into your space. To dig deeper into this topic, we spoke with Kevin Brasler, executive editor at nonprofit Consumers’ Checkbook , a consumer advocacy group that helps homeowners save money and make smart choices. With decades of experience evaluating service providers, Kevin shares insights on how to budget wisely, avoid common renovation mistakes, and know when to hire a professional versus taking the DIY route. 1. Add fresh paint to the walls of your home Painting is one of the most affordable ways to refresh your home. A gallon of quality paint costs $30 to $50, with a full room averaging around $350 . Neutral shades like gray, beige, or white appeal to most buyers, while accent colors such as navy, forest green, or mustard add personality. For a calming vibe, try sage or powder blue. Brasler notes that painting is one of the best DIY-friendly projects homeowners can take on. “Good DIY projects are those that involve mostly labor: painting, basic tile work, installing fixtures that don’t require new wiring or plumbing, landscaping, and most flooring jobs,” he says. 2. Update your cabinet hardware A cabinet hardware update is a subtle yet effective strategy to elevate your home’s functionality and aesthetic appeal. Swapping outdated or generic cabinet handles and knobs for modern, stylish alternatives instantly transforms kitchens and bathrooms. Consider sleek brushed nickel handles for a contemporary touch, or opt for vintage-inspired brass knobs for a timeless charm. This modest investment typically costs between $2 to $10 per piece. 3. Change the kitchen backsplash A new backsplash can quickly refresh your kitchen while protecting your walls. A custom kitchen backsplash protects your walls from daily wear and creates a focal point that elevates the entire room. Opt for affordable ceramic or glass tiles, which can be found for as low as $1 to $5 per square foot. Staying within a $1,000 budget for a standard-sized kitchen is doable with those materials. Or you can go for a peel-and-stick backsplash that is not only budget-friendly, but a quick solution to make your kitchen stand out. Brasler stresses that getting multiple estimates is critical for even small-scale projects like this. “The biggest mistake homeowners make is not getting multiple bids. Even for smaller projects, you should get at least three written estimates; five is better,” he explains. 4. Switch to energy-efficient lighting By making the switch to energy-efficient lighting, you’ll not only improve the sustainability of your home but also create a more comfortable and inviting living environment. Switching to LED bulbs, which typically cost between $2 to $10 each, saves energy and reduces utility bills over time. Beyond the financial benefits, the crisp and vibrant illumination of energy-efficient lighting can effortlessly enhance your home’s overall mood and appeal. 5. Create a beautiful landscape A simple landscaping update is another low-cost project that adds value. Try planting vibrant flowers, shrubs, and trees, which can cost anywhere from $100 to $500, depending on the size and variety. Add mulch or decorative stones to create a polished look for approximately $50 to $150, while adding affordable outdoor lighting options typically range from $50 to $200. Low-maintenance features lower costs down while still making a strong impression. For most landscaping updates, DIY is both practical and cost-effective. Still, Brasler advises calling in professionals for anything involving gas, high-voltage electrical, or structural work. 6. Install a smart thermostat A smart thermostat, such as popular models like Nest or Ecobee, typically costs between $150 to $300, depending on the brand and features. Homeowners can often handle the installation themselves, avoiding additional labor costs. Once installed, these intelligent devices learn your preferences, allowing for automated temperature adjustments, and can be controlled remotely via smartphone apps. 7. Refurbish or paint the front door Refresh your curb appeal by refurbishing or painting the front door – a low-cost project with instant impact. Sanding and restaining often costs under $100 and requires just a few materials. Another choice is to use high-quality exterior paint, which typically ranges from $30 to $50 per gallon, providing a fresh, vibrant color that suits your home’s style. 8. Add floating shelves or built-ins Consider adding floating shelves or built-in storage solutions to maximize space and keep your home organized. Floating shelves, available for as little as $20 to $50 per shelf, provide an affordable and stylish way to showcase decor or organize essentials. For a more customized approach, DIY built-ins can be crafted using plywood or ready-to-assemble shelving units, typically ranging from $100 to $300. 9. Upgrade your kitchen sink and faucet Breathe new life into your kitchen with a sink and faucet upgrade. Faucets usually run $100 to $300, and sinks $200 to $500. Consider a sleek pull-down faucet and a resilient stainless steel or granite composite sink to improve both function and style. Spending $300 to $800 on a sink and faucet upgrade can instantly refresh your kitchen’s look and make daily tasks easier. 10. Add safety measures to protect your home Smart security cameras or a basic surveillance system now offer affordable and effective protection. Investing in a home surveillance system, typically from $200 to $500, allows real-time monitoring and deterrence against potential threats. The addition of smart cameras, with features like motion detection and remote access via smartphone apps, can improve your home’s overall safety and convenience. With a budget-conscious investment of $500 to $1,000, you can create a comprehensive security network covering critical areas of your property. Tips for finding good contractors Even for smaller projects, working with contractors requires careful planning. Brasler emphasizes the value of comparison shopping. “Get proposals and detailed pricing from at least three reputable, licensed contractors,” he advises. “The only way to ensure you’re paying a fair price is to initiate competition.” He also suggests: Check references thoroughly. Ask questions like: Did the company follow plans? Did it finish on time? Was the work professional? Did the contractor offer low-cost solutions and stick to agreed prices? Were problems handled promptly and effectively? Did the team communicate clearly throughout the project? Was disruption to your daily life kept to a minimum? Did the finished results meet your expectations for quality and appearance? Was the contractor flexible and fair about changes if you adjusted plans? Ask neighbors and friends for referrals. Word-of-mouth often uncovers the best local contractors. Look for complaints. Check ratings at Checkbook.org or your local Better Business Bureau and be cautious with online reviews as they can’t always be trusted. Common mistakes when budgeting for small renovations Brasler states the biggest budgeting mistake is skipping multiple bids. “A contractor charging $800 might be using premium materials while the $500 bid uses builder-grade stuff. Try to get prices from each business for the exact same work,” he explains. He also reminds homeowners not to assume that a low price means low quality. “For decades we have evaluated all kinds of businesses and often find some of the best companies have the lowest prices,” he says. When to DIY vs. hire a pro While DIY saves money, Brasler stresses knowing your limits. “Call in pros to deal with anything involving gas, high-voltage electrical, or structural changes. Ditto for work that requires a permit and inspection,” he advises. For tasks like painting, basic landscaping, or adding shelves, homeowners can usually manage on their own. Keep expectations realistic since DIY projects often take longer and may not match professional results. The bottom line Budget-friendly renovations under $1,000 can make a big difference in your home’s look, comfort, and value. From painting and landscaping to updating fixtures and adding smart technology, these projects prove you don’t need to overspend to refresh your space. As Brasler reminds homeowners, “the key is balancing creativity with caution.” By comparing bids, avoiding common budgeting mistakes, and knowing when to call in the pros, you can achieve lasting results without stretching your wallet.